
In the unique soil landscape of the Dallas-Fort Worth area, a proactive approach to foundation health is not just recommended, it’s essential. The expansive clay soil that defines North Texas is in a constant state of flux, shrinking in the intense summer heat and swelling with seasonal rains. This relentless cycle puts immense, ongoing stress on your property’s foundation, creating a high-risk environment for issues that can compromise its structural integrity and significantly decrease its value.
A casual walk-around is simply not enough to protect your investment. Homeowners and property managers need a systematic process to identify subtle but critical warning signs before they escalate into major structural failures. This comprehensive foundation inspection checklist provides that exact framework. It moves beyond generic advice and offers a detailed, actionable guide for identifying, documenting, and understanding the specific signs of foundation distress common in DFW.
Inside, you will find a clear roadmap for:
- Deciphering different types of cracks.
- Measuring floor settlement and slope.
- Assessing moisture risks and drainage effectiveness.
- Evaluating key structural components.
Each point on this list is designed to empower you with the practical knowledge needed to catch problems early, prevent costly repairs, and determine with confidence when it’s time to call a professional. We’ll help you build your expertise, starting from the ground up.
1. Visible Foundation Cracks and Fracture Patterns
The most direct evidence of foundation stress often appears as visible cracks in your slab, stem walls, or exterior brickwork. As a cornerstone of any thorough foundation inspection checklist, identifying and analyzing these fractures is crucial for assessing your property’s structural health. The expansive clay soil in the Dallas-Fort Worth area is notorious for swelling with moisture and shrinking during droughts, placing immense pressure on concrete foundations and causing distinct fracture patterns.
Understanding these patterns is the first step in diagnosing the underlying issue. Not all cracks signal a major problem, but knowing how to classify them helps determine the urgency of the situation.
Classifying and Measuring Cracks
The type of crack provides clues about the forces acting on your foundation. During your inspection, carefully document the following characteristics for each fracture you find:
- Direction: Vertical and diagonal cracks often indicate settlement or heave, while horizontal cracks, especially in basement or stem walls, can signal hydrostatic pressure from surrounding soil.
- Pattern: A single, isolated crack may be minor, but patterns like stair-step cracks in brick mortar or spider-web fractures on a slab surface are significant red flags. Stair-step cracking suggests foundation rotation or differential settlement, a common issue in DFW homes.
- Width: The width is a critical indicator of severity. Hairline cracks (less than 1/8-inch) are often from concrete curing. However, cracks wider than 1/4-inch demand immediate attention as they may indicate active structural movement.
DFW Soil Impact: In areas like Arlington, spider-web fracturing on a garage floor is a classic sign of expansive clay soil “heave,” where the soil swells upward. Conversely, a diagonal crack running from a corner of a home in Dallas could indicate pier settlement due to soil shrinkage during a summer drought.
Actionable Inspection and Documentation Tips
Proper documentation is essential for monitoring changes and for any potential insurance claims or professional consultations.
- Use a Scale Reference: Photograph every significant crack with a ruler, tape measure, or coin placed next to it. This provides an undeniable visual record of its size.
- Map Your Findings: Create a simple schematic drawing of your foundation’s perimeter and interior slab. Mark the location, length, and direction of each crack on this map.
- Track Progression: Use colored tape or a marker to mark the endpoints of a crack. Check it again in 3-6 months to see if it has grown in length or width. This helps determine if the movement is active.
While diligent monitoring is key, certain discoveries are clear triggers to seek expert advice. If you discover cracks that are wider than a quarter-inch, are actively growing, or are accompanied by other signs like sticking doors or uneven floors, it’s a critical indicator. Understanding when to call a professional for foundation repairs can save you from far more extensive and costly damage down the line.
2. Foundation Settlement and Uneven Floors
Beyond visible cracks, one of the most significant indicators of foundation distress is uneven settlement, which manifests as sloping floors, sticky doors, and misaligned walls. This item on your foundation inspection checklist focuses on identifying these subtle but critical shifts in your home’s structure. Settlement occurs when the soil beneath your foundation compresses or moves. In the Dallas-Fort Worth region, the volatile nature of expansive clay soil, which shrinks dramatically during droughts and swells with rain, is a primary cause of this damaging movement.
Identifying unevenness is a key step in diagnosing how your foundation is responding to these soil pressures. While minor settling is normal in many structures, significant or differential settlement (where one part of the foundation moves more than another) points to a serious underlying problem that requires immediate attention.

Quantifying and Detecting Settlement
Professional inspectors use precise tools to measure settlement, but you can spot the warning signs with careful observation. Look for these common indicators of uneven floors and foundation movement:
- Feel and Function: Do floors feel bouncy, spongy, or sloped when you walk on them? Are doors and windows suddenly sticking or showing uneven gaps around their frames? These are classic signs that the structure is no longer level.
- Visual Misalignment: Look for gaps between the baseboards and the floor, or where walls meet the ceiling. Interior drywall cracks radiating from the corners of door and window frames are another telltale sign.
- Professional Measurement: A professional will use a laser level or a transit to get precise readings. They measure the elevation at multiple points across the floor, and differences greater than 1-inch over 20 feet often signal a significant issue.
DFW Soil Impact: A Plano homeowner noticing bouncy hardwood floors might discover a 1.5-inch settlement in their pier-and-beam foundation due to soil movement. Similarly, a home in Arlington with sticky doors could be experiencing a 2-inch drop in one corner caused by severe clay shrinkage during a hot, dry summer.
Actionable Inspection and Documentation Tips
Accurately documenting settlement is crucial for tracking the issue and providing clear data to a foundation repair specialist.
- Test with Simple Tools: Place a marble or a small ball on the floor in various rooms. If it consistently rolls in the same direction, it indicates a slope. You can also use a simple carpenter’s level to check for unevenness.
- Photograph Gaps: Take clear, well-lit photos of any gaps around doors, windows, and baseboards. Place a tape measure in the frame to document the size of the gap for comparison later.
- Map Your Measurements: On your foundation schematic, note the locations where you observe slopes, bouncing, or other signs of settlement. If you get professional measurements, record these elevations and the date on your map.
- Monitor Interior Cracks: Mark the ends of any new drywall cracks that appear alongside uneven floors. Check them every few months to see if they are expanding, which indicates ongoing movement.
When you observe measurable settlement combined with functional issues like sticking doors, it’s a clear signal that the structural integrity is compromised. These symptoms often require a professional solution, and understanding more about the house leveling process can prepare you for the necessary next steps to restore your home’s stability.
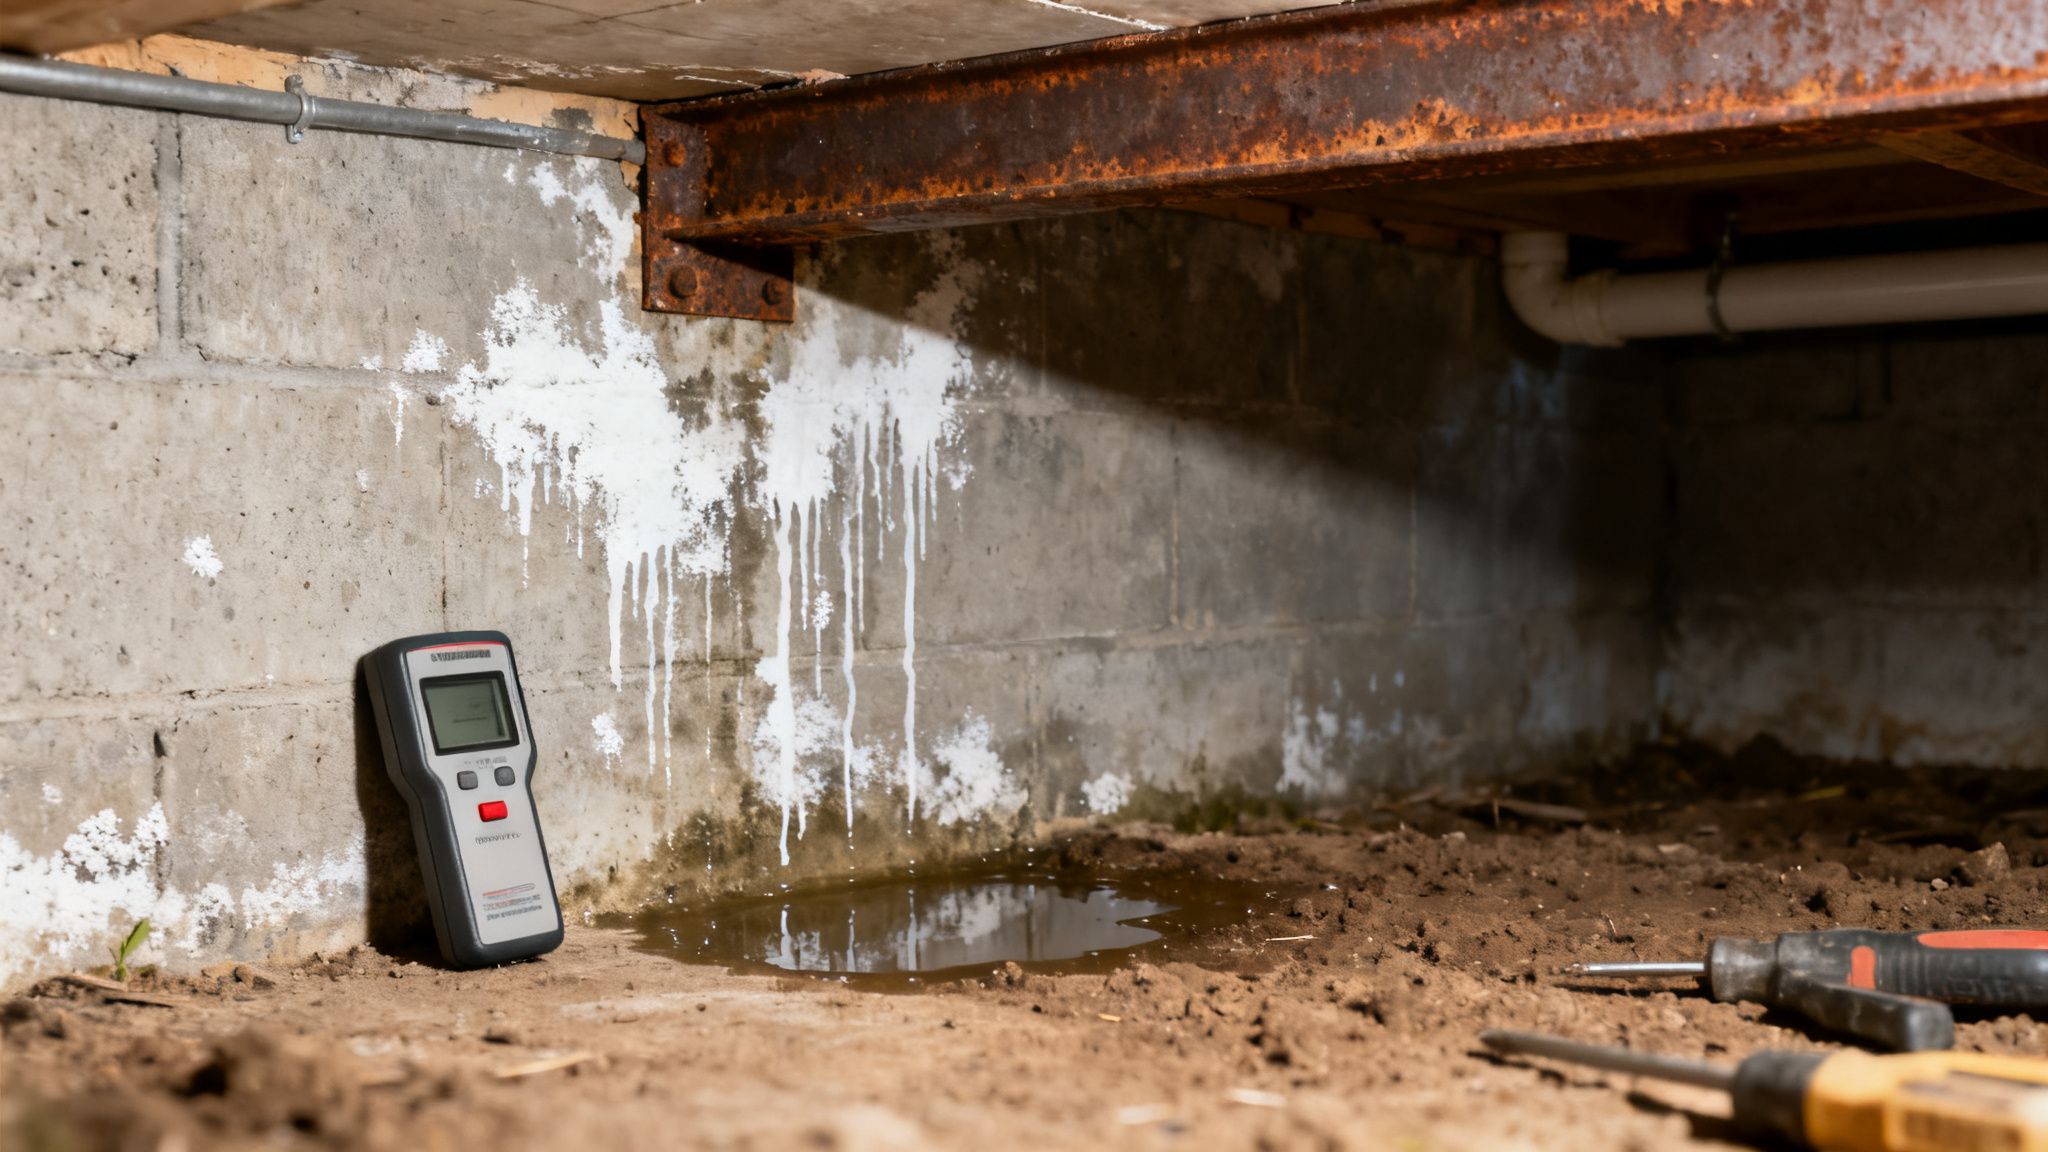
3. Moisture Intrusion and Water Damage Signs
Water is the primary adversary of a healthy foundation, and its presence is a critical red flag in any foundation inspection checklist. Uncontrolled moisture weakens concrete, corrodes steel reinforcement, and can exacerbate the shrink-swell cycle of North Texas clay soil. Identifying signs of water intrusion early is essential to prevent accelerated deterioration and maintain your property’s structural integrity.
In the DFW area, moisture issues often stem from intense rainfall events overwhelming poor drainage systems, improper lot grading, or plumbing failures. These problems manifest as distinct visual and olfactory cues that signal water is penetrating where it shouldn’t be.
Classifying and Identifying Moisture Issues
Different signs of water damage point to different problems. During your inspection, be on the lookout for these key indicators and document their location and severity:
- Efflorescence: A chalky, white crystalline deposit on concrete or brick surfaces. It occurs when water seeps through the material, dissolves salts within it, and then evaporates, leaving the salt residue behind.
- Staining and Discoloration: Dark stains on concrete, drywall, or wood framing indicate persistent moisture exposure. Rust-colored stains near rebar can signal internal corrosion, a serious structural concern.
- Mold or Mildew: The presence of mold, often accompanied by a musty odor, confirms high humidity and poor ventilation. This is particularly common in crawlspaces and basements.
- Spalling or Flaking: This is the chipping or peeling of the concrete surface, often caused by the freeze-thaw cycle of trapped water or the expansion from rusting rebar.
DFW Soil Impact: In Fort Worth, a commercial property showing rust stains and spalling concrete in its crawlspace could be suffering from seepage after heavy rains overwhelmed a failed vapor barrier. A Dallas homeowner finding efflorescence on basement walls alongside a musty smell might discover their lot grading and downspout discharge are pooling water directly against the foundation.
Actionable Inspection and Documentation Tips
Systematically checking for and recording moisture is vital for diagnosing the source and creating a remediation plan.
- Use a Moisture Meter: A moisture meter provides quantitative data. Test concrete walls, wood piers, and soil in multiple locations to identify problem areas with elevated moisture levels.
- Time Your Inspection: The best time to check for active water intrusion is during or immediately after a heavy rainfall. This allows you to observe how your drainage systems perform under stress.
- Inspect Drainage Systems: Ensure gutters are clear and downspouts discharge water at least 4-6 feet away from the foundation. The ground should slope away from the house (a minimum of 1 inch per 10 feet) to direct water flow.
- Evaluate Crawlspaces: Look for standing water, a damp earthen floor, or a torn/missing vapor barrier. Check for adequate ventilation, as trapped humidity is a primary cause of wood rot and mold.
Discovering persistent dampness, significant mold growth, or spalling concrete are clear signals that your foundation is under attack from moisture. Addressing the root cause, whether it’s poor grading or a failed plumbing line, is a non-negotiable step in protecting your investment and avoiding far more significant structural repairs.
4. Structural Support System Integrity (Piers, Posts, and Beams)
Beyond the visible slab, the integrity of the underlying support system is a critical component of a comprehensive foundation inspection checklist. For both pier-and-beam and certain slab-on-grade foundations, elements like concrete piers, wooden or steel posts, and horizontal beams bear the primary load of the structure. Evaluating their condition is essential for understanding the root cause of issues like sagging floors or interior wall cracks. In the diverse housing stock of Dallas-Fort Worth, from historic pier-and-beam homes to modern constructions, these support systems face unique challenges from moisture and soil movement.
A failing pier, a rotted post, or an undersized beam can compromise the entire structure, leading to localized settlement and significant interior damage. Identifying signs of degradation early prevents more severe and widespread problems.
Assessing Material Condition and Alignment
The health of your support system depends on the materials used and their proper installation. During your inspection, focus on signs of distress and misalignment that indicate structural strain.
- Material Condition: Check for spalling (flaking or chipping) and rust stains on concrete piers, which can expose and weaken internal rebar. For wooden posts and beams, look for signs of rot, termite damage (like mud tubes), or excessive moisture saturation, which severely reduces load-bearing capacity.
- Alignment and Settlement: Use a plumb bob or laser level to check if posts and piers are perfectly vertical. Any tilting or leaning is a significant red flag for settlement or lateral pressure. Note any gaps between the tops of piers/posts and the beams they are meant to support, as this indicates the structure has settled away from its support.
- Beam Integrity: Examine horizontal beams for sagging, cracking, or twisting. A bowed beam is a clear sign it is overloaded or failing. In pier-and-beam foundations, proper shimming is crucial; look for crushed or deteriorated shims that are no longer providing adequate support.
DFW Soil Impact: In a Plano pier-and-beam home, high crawlspace humidity can cause wooden posts to rot at their base, leading to an 8-inch floor drop in one corner. In a Fort Worth commercial building, expansive clay soil movement can cause concrete piers to shift and spall, revealing corroded rebar and compromising their structural capacity.
Actionable Inspection and Documentation Tips
A methodical approach to inspecting your crawlspace or support elements ensures you capture all necessary data for a professional assessment.
- Map Your Supports: Draw a simple layout of your crawlspace, noting the location of each pier, post, and beam. This map will be invaluable for tracking which specific supports are showing signs of failure.
- Measure and Document: Photograph each compromised element with a tape measure visible to document the extent of spalling, the width of cracks, or the height of any gaps. Measure the spacing between piers to ensure it aligns with standard building practices; inadequate spacing can overload existing supports.
- Sound Test Components: Gently tap concrete piers and wooden posts with a hammer. A solid, ringing sound typically indicates good condition, while a dull or hollow thud can reveal internal decay, voids, or delamination not visible on the surface.
If your inspection reveals rotted wood, severely corroded steel, or multiple leaning piers, these are clear indicators that the support system is compromised. For homeowners with these types of structures, understanding the specifics of pier and beam foundation repair is the next step in securing your home’s long-term stability.
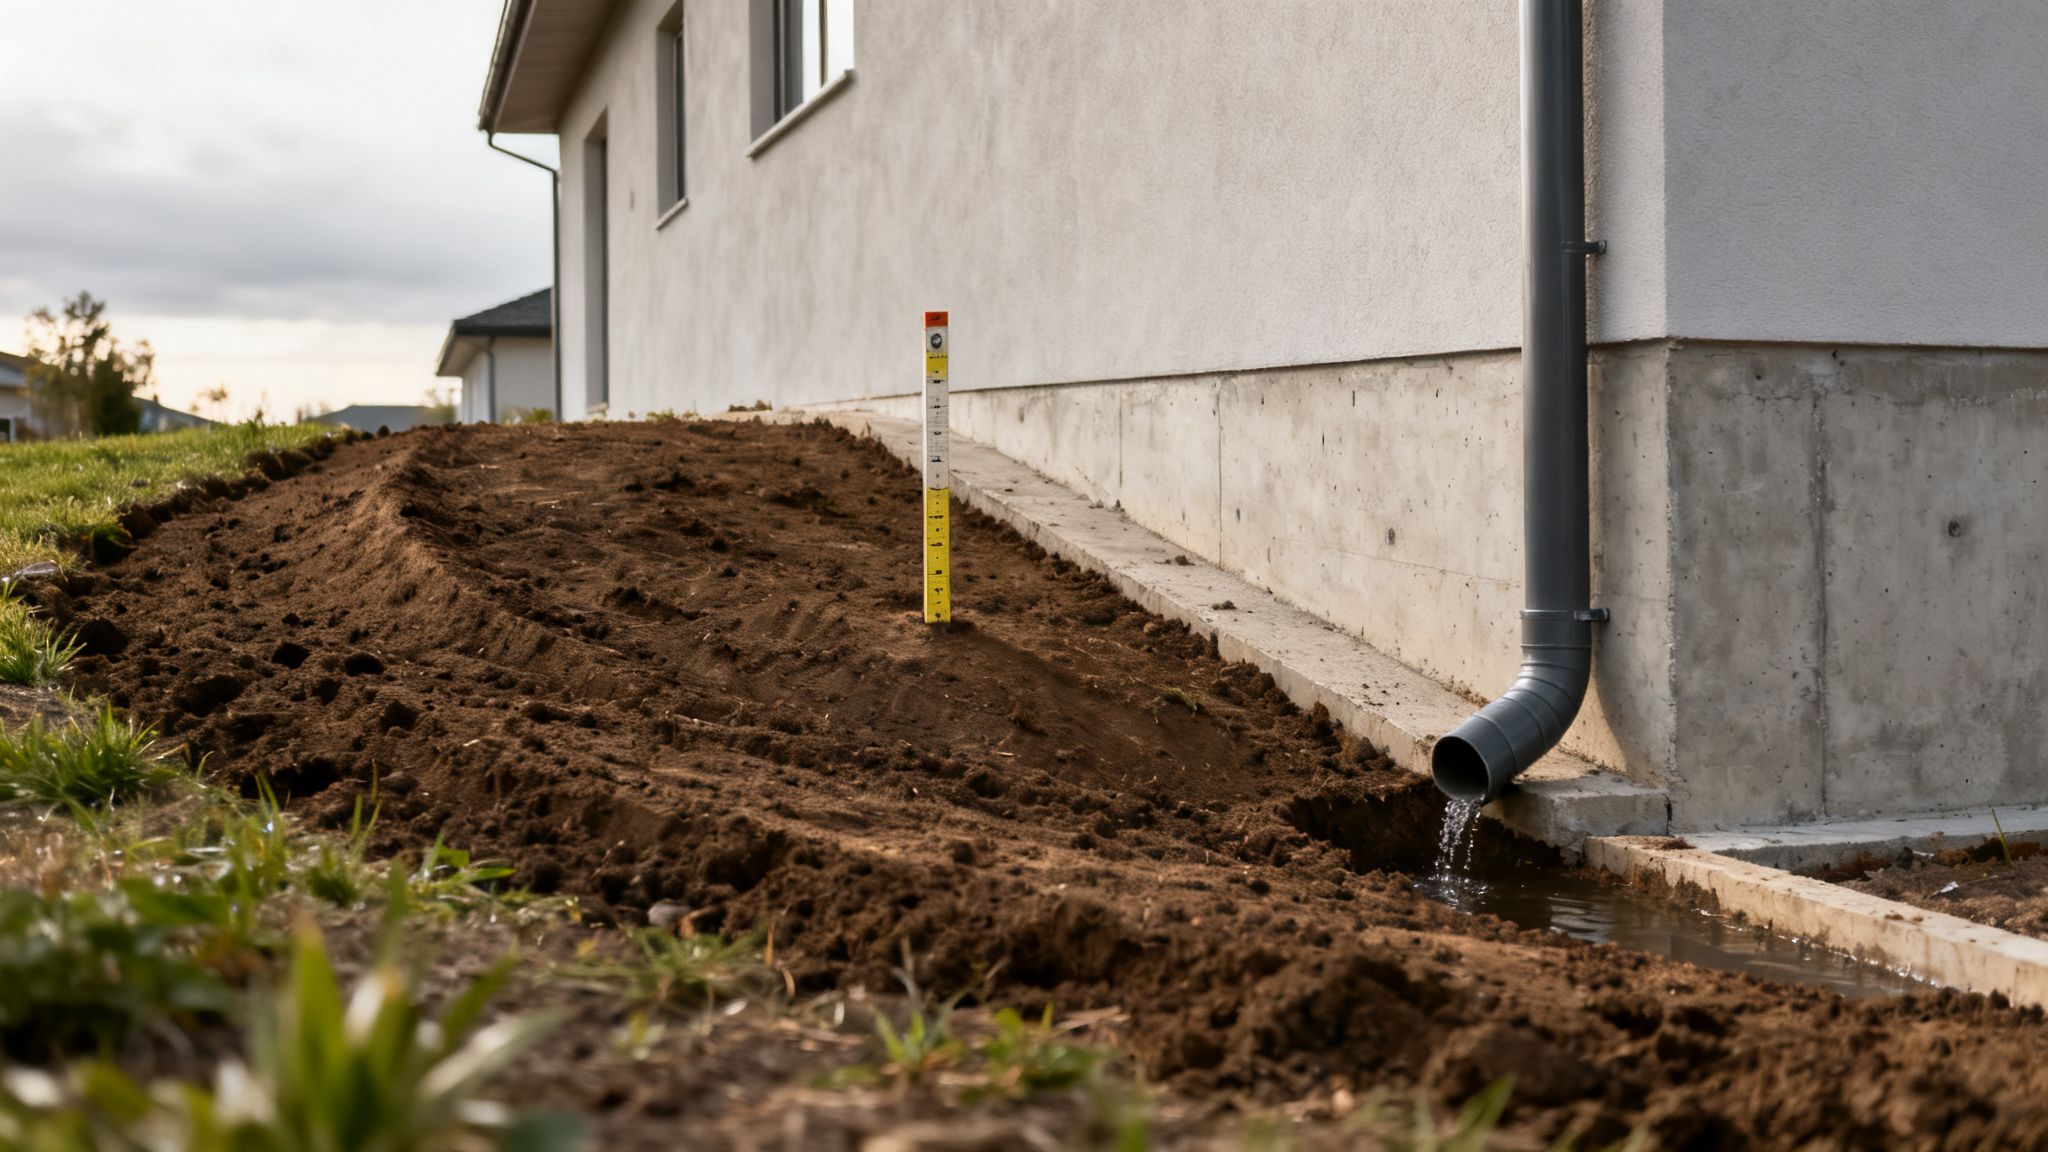
5. Exterior Foundation Slope and Grading
The ground surrounding your home is your first line of defense against water-related foundation damage. A crucial part of any foundation inspection checklist is assessing the exterior slope and grading, as it dictates how water behaves around your property. Proper grading ensures that rainwater and runoff flow away from your foundation walls, preventing the soil saturation that leads to significant structural stress. In the Dallas-Fort Worth area, the combination of expansive clay soil and intense rainfall makes improper grading one of the most common and damaging issues for homeowners.
When the ground slopes toward your house, water pools against the concrete. This oversaturates the clay soil, causing it to swell (heave) and exert immense pressure on your foundation. Conversely, as that pooled water evaporates during dry spells, the soil shrinks away, leading to settlement.
Measuring and Assessing Your Grade
The ideal slope should fall away from your foundation at a minimum rate of six inches over the first ten feet. This gradient is essential for effective water management and foundation protection.
- Positive vs. Negative Slope: A positive slope grades downward and away from the house, which is correct. A negative slope grades back toward the foundation, creating a basin for water to collect. Even a flat grade is problematic.
- Hardscape Influence: Patios, driveways, and walkways should also be sloped away from the structure. A driveway that funnels water toward your garage is a major liability.
- Landscape and Soil Compaction: Overly deep mulch beds, raised garden planters against the wall, or poorly compacted fill dirt can create dams that trap water, defeating the purpose of an otherwise good grade.
DFW Soil Impact: In Frisco, a newly installed patio with a slight negative grade can direct storm runoff directly against the foundation, saturating the clay soil and causing upward heave. Similarly, in Arlington, years of soil settlement can create a low spot or “swale” along the foundation perimeter, which becomes a mini-moat during heavy rains and leads to differential movement.
Actionable Inspection and Documentation Tips
Systematically evaluating your property’s grading can reveal hidden risks before they cause severe damage.
- Use a Level: For a precise measurement, place a long, straight board against your foundation wall and use a carpenter’s or laser level to check the slope over the first 10 feet.
- Inspect During Rain: The best time to check your grading is during or just after a rainstorm. Observe where water flows, where it pools, and how quickly it drains away from the foundation.
- Document Low Spots: Photograph any areas where the ground appears to dip toward the house or where you see standing water. Use a tape measure to show the depth of the water or depression.
- Trace Drainage Paths: Follow your downspout extensions to ensure they are discharging water well beyond the 10-foot perimeter zone, not just dumping it at the corner of the house.
Addressing poor grading is often one of the most effective and least expensive ways to protect your foundation. If you identify a negative slope or persistent pooling water, it is a clear sign that corrective action is needed to prevent long-term moisture intrusion and soil-related foundation movement.
6. Concrete Spalling, Scaling, and Surface Deterioration
Beyond distinct cracks, the overall surface health of your foundation concrete provides critical insight into its durability and potential vulnerabilities. As a key component of a comprehensive foundation inspection checklist, evaluating surface deterioration like spalling (chipping or flaking), scaling (peeling), and efflorescence (salty deposits) is essential. These conditions often indicate underlying moisture issues, which are a constant battle given the unpredictable DFW climate.
While less severe than large fractures, surface degradation can be a precursor to more significant structural problems. Ignoring these signs allows moisture to penetrate the concrete, potentially reaching and corroding the internal steel rebar, which is the skeleton of your foundation.
Identifying and Diagnosing Surface Issues
The type of surface decay reveals the nature of the stressor affecting your foundation. During your inspection, look for and document these common conditions:
- Spalling: This appears as chipped, flaked, or broken-away pieces of concrete, often circular or oval, exposing the aggregate (gravel) or even the rebar beneath. It’s frequently caused by moisture penetrating the concrete and causing the rebar to rust and expand.
- Scaling: This is the peeling or flaking away of the top surface of the concrete in thin layers. It can result from poorly mixed concrete, exposure to deicing salts, or freeze-thaw cycles, though the latter is less common in North Texas.
- Efflorescence: This is a white, powdery, or crystalline deposit on the concrete surface. It is a tell-tale sign of water moving through the concrete, dissolving salts, and leaving them behind as it evaporates.
DFW Soil Impact: In Fort Worth, a home’s foundation perimeter might exhibit scaling due to runoff from a salted driveway during a rare winter storm. In an Arlington home, persistent white efflorescence on the stem wall indicates consistent subsurface moisture movement, a direct consequence of poor drainage interacting with expansive clay soils.
Actionable Inspection and Documentation Tips
Detailed documentation helps you track the progression of deterioration and provides valuable information for a professional consultant.
- Photograph with Scale: Take clear photos of any spalled or scaled areas. Place a ruler or coin next to the damage to provide a clear sense of its size and depth.
- Map the Deterioration: On your foundation schematic, mark the locations of all surface issues. Note the type of damage (spalling, scaling) and its approximate square footage.
- Gently Probe the Area: Use a screwdriver to gently probe spalled areas. Assess the depth of the damage and note if rebar is exposed. Document the condition of any visible rebar, specifically looking for rust or corrosion.
Discovering spalling that exposes rusted rebar is a clear call to action. This condition signals that the structural integrity of the foundation is actively being compromised. Addressing the root moisture problem and scheduling a professional concrete repair can prevent accelerated degradation and a far more costly structural failure.
7. Interior Evidence of Foundation Problems (Cracks, Gaps, Misalignment)
The structural story of your foundation is often told on the inside of your home. Interior signs like drywall cracks, separating baseboards, and misaligned frames are direct indicators of foundation movement. This part of your foundation inspection checklist is critical because these signs often appear before more obvious exterior damage, providing an early warning system for homeowners. In the Dallas-Fort Worth area, where slab-on-grade foundations are common, interior distress is a primary symptom of soil-related settlement or heave.
Recognizing these interior patterns is key to understanding the type and direction of foundation stress. A systematic interior walk-through can reveal subtle clues that, when pieced together, paint a clear picture of your home’s structural health.
Classifying and Measuring Interior Damage
The location and type of interior damage provide vital information about the underlying foundation issue. During your inspection, document the following signs of distress:
- Drywall Cracks: Diagonal cracks extending from the corners of doors and windows often signal shear stress caused by differential settlement. Horizontal cracks at mid-wall height can indicate foundation rotation or bowing walls.
- Gaps and Separations: Look for gaps where walls meet the ceiling or floor. Separated baseboards or crown molding are clear indicators that parts of the foundation are sinking or heaving, pulling the framing with them.
- Misalignment: Doors that stick or don’t latch properly and windows that are difficult to open or close suggest their frames have been twisted out of square by foundation movement. This is a classic sign of uneven settling.
DFW Soil Impact: In a Plano home, a series of diagonal drywall cracks in the living room might correlate directly to a sinking corner of the foundation due to soil shrinkage. Similarly, a Fort Worth property showing horizontal mid-wall cracking and baseboard gaps often points to foundation rotation caused by uneven moisture in the underlying expansive clay.
Actionable Inspection and Documentation Tips
Thorough documentation of interior issues is crucial for diagnosing the problem and tracking its progression. This evidence is invaluable when consulting with foundation repair specialists.
- Map Interior Damage: Create a simple floor plan of your home and mark the exact location, length, and direction of every crack and gap. Note which doors or windows are misaligned.
- Measure and Photograph: Use a tape measure to document the width of gaps and separations. Photograph all damage with a ruler or coin for scale, capturing both close-up shots and wider views to show context.
- Check for Previous Repairs: Look for tell-tale signs of past drywall repairs, like uneven paint texture or visible taping lines. This can indicate historical problem areas that may be experiencing renewed movement.
If you discover drywall cracks wider than 1/8-inch, gaps between your floor and walls, or multiple doors that suddenly begin to stick, these are clear signals. These interior symptoms are not merely cosmetic; they are direct communications from your foundation, telling you it’s time to seek a professional evaluation.
8. Expansive Soil Behavior and Environmental Factors
Understanding the ground beneath your home is as critical as inspecting the structure itself, especially in North Texas. This part of a foundation inspection checklist moves beyond the concrete and into geology, assessing the soil and environmental conditions that cause foundation movement. The Dallas-Fort Worth region is built on expansive clay soils that shrink dramatically during droughts and swell with moisture, creating a powerful, cyclical force that lifts and drops foundations.
Evaluating these environmental factors provides a holistic view of foundation stress. It helps explain why problems occur and informs long-term stabilization strategies, moving from reactive repairs to proactive management of your property’s unique geological challenges.
Analyzing Soil and Site Conditions
A comprehensive assessment looks at how your specific property interacts with the volatile North Texas soil. During your inspection, focus on gathering evidence of soil behavior and moisture patterns:
- Drainage Patterns: Observe how water flows around your foundation. Is it pooling near the walls or draining away effectively? Poor drainage super-saturates clay soil, leading to heave.
- Landscaping Effects: Large trees near a foundation can draw massive amounts of water from the soil, causing it to shrink and the foundation to settle. Conversely, flower beds against the house with frequent watering can create isolated areas of swelling.
- Seasonal Evidence: Look for cyclical patterns. Do cracks appear or widen during the dry summer months and seem to close after heavy rains? This is a classic sign of active expansive clay.
DFW Soil Impact: In a Plano neighborhood, a home might show severe settlement after large, mature trees are removed. This is often because the trees were helping to manage soil moisture; their removal leads to sudden drying and shrinkage of the clay. In Fort Worth, a commercial property built over varying clay thicknesses could experience differential settlement, where one part of the building sinks faster than another.
Actionable Inspection and Documentation Tips
Documenting soil and environmental factors is key to predicting future movement and designing effective solutions.
- Map Your Landscape: Sketch your property, noting the location of large trees, sprinkler heads, downspouts, and areas with poor drainage. This map helps visualize moisture sources.
- Request Soil Records: For newer properties, soil boring reports may be available through city records. These documents provide invaluable data on the specific type and depth of clay beneath your home.
- Interview Previous Owners: If possible, ask long-term neighbors or previous owners about the property’s history with foundation issues and any seasonal changes they noticed.
Recognizing that your foundation’s health is directly tied to the soil and water around it is a crucial insight. If you observe significant negative drainage, large trees within 10 feet of the home, or cracks that change with the seasons, it’s a clear signal. Understanding these environmental triggers helps you work with a professional to implement solutions like root barriers or a soil moisture management plan, addressing the root cause of the problem.
8-Point Foundation Inspection Comparison
| Item | 🔄 Implementation Complexity | ⚡ Resource Requirements | ⭐📊 Expected Outcomes | Ideal Use Cases | Key Advantages | 💡 Tips |
|---|---|---|---|---|---|---|
| Visible Foundation Cracks and Fracture Patterns | Low–Medium 🔄 – visual survey + pattern analysis | Minimal–Moderate ⚡ – crack gauges, camera, occasional depth tools | Early detection & classification ⭐; trend data for active vs stable cracks 📊 | Routine inspections, initial assessments, crack monitoring | Non‑invasive; reveals likely causes; baseline for monitoring | Photograph with scale, mark locations, recheck every 6 months |
| Foundation Settlement and Uneven Floors | High 🔄 – precise leveling and differential measurement | High ⚡ – laser level/transit, skilled technician, calibration | Quantified settlement and repair scope ⭐; actionable leveling data 📊 | Sticky doors, sloping/bouncy floors, suspected pier failure | Precise measurement guides pier/leveling work and prioritization | Take readings at multiple reference points; test across seasons |
| Moisture Intrusion and Water Damage Signs | Medium 🔄 – visual + moisture diagnostics | Moderate ⚡ – moisture meters, crawlspace access, drainage tools | Source identification and moisture quantification ⭐; reduced deterioration risk 📊 | Damp crawlspaces, efflorescence, mold, post‑rain issues | Prevents concrete/steel corrosion; improves indoor air quality | Inspect after heavy rain; check gutters/downspouts; use moisture meter |
| Structural Support System Integrity (Piers, Posts, and Beams) | High 🔄 – structural evaluation in confined spaces | High ⚡ – crawlspace access gear, structural tools, expertise | Condition rating and load recommendations ⭐; repair/reinforcement plan 📊 | Pier‑and‑beam homes, sagging floors, visible post/beam damage | Prevents catastrophic failure; informs targeted reinforcement | Probe for rot, measure pier spacing, document corrosion and alignment |
| Exterior Foundation Slope and Grading | Low–Medium 🔄 – slope measurement and surface evaluation | Low–Moderate ⚡ – laser/water level, fill/compaction materials | Corrected drainage and reduced moisture exposure ⭐; lower long‑term risk 📊 | Surface pooling, improper hardscape drainage, new landscaping | Cost‑effective fixes often prevent major moisture problems | Check during/after rain; ensure ≥1″ fall per 10′ from foundation |
| Concrete Spalling, Scaling, and Surface Deterioration | Medium 🔄 – surface/deterioration assessment | Moderate ⚡ – depth gauges, possible rebar inspection/testing | Repair vs replacement recommendation ⭐; corrosion risk assessment 📊 | Visible spalls, exposed rebar, widespread scaling | Early repair prevents rebar corrosion; restores durability | Photograph with scale, probe spalls gently, consider sealant on intact areas |
| Interior Evidence of Foundation Problems (Cracks, Gaps, Misalignment) | Low 🔄 – visual documentation and pattern analysis | Low ⚡ – camera, tape measure, simple tools | Early warning and correlation to foundation movement ⭐; supports claims 📊 | Homeowner‑noticed drywall cracks, misaligned doors/windows | Cost‑effective detection; communicates issues clearly to owners | Map and date cracks, measure gap widths, record door/window operation |
| Expansive Soil Behavior and Environmental Factors | High 🔄 – geotechnical analysis and seasonal study | High ⚡ – soil borings, lab tests, geotech expertise | Predictive risk assessment and tailored mitigation ⭐; long‑term strategy 📊 | Areas with high clay content, recurring seasonal movement | Informs durable solutions and moisture management plans | Request boring logs, assess irrigation/trees, consider soil testing (PI/clay%) |
From Checklist to Action: Securing Your Foundation’s Future
Navigating the complexities of foundation health can feel overwhelming, especially in a region like Dallas-Fort Worth where the active clay soil presents a constant challenge. However, by completing the detailed walkthrough in this article, you have transformed from a passive observer into a proactive guardian of your property’s most critical asset. This foundation inspection checklist is more than just a list of items to observe; it’s a powerful framework for early detection, informed decision-making, and long-term asset protection.
You now possess the knowledge to distinguish between a minor cosmetic flaw and the early warning signs of significant structural distress. This ability to identify issues before they escalate is the single most important factor in preventing costly, extensive repairs down the road.
Key Takeaways: From Observation to Insight
The true value of this checklist lies not just in identifying problems, but in understanding their context and implications. Let’s distill the most crucial lessons learned:
- Documentation is Your Strongest Ally: A single crack is a snapshot; a documented series of photos and measurements over time tells a story. Your detailed records are invaluable for tracking the rate of change, which is often more critical than the initial size of a crack or gap. This historical data is also indispensable for insurance claims and provides a clear, objective baseline for any professional you hire.
- Water is the Primary Antagonist: A recurring theme throughout our checklist is the destructive power of water. From poor exterior grading and clogged gutters to plumbing leaks and high humidity in the crawl space, moisture is the catalyst for soil expansion, concrete deterioration, and mold growth. Managing water flow around and under your property is non-negotiable for foundation stability in North Texas.
- The Inside Reflects the Outside: Foundation problems rarely stay hidden beneath the surface. The symptoms you see inside your home – sticking doors, cracked drywall, and gapping trim – are direct communications from your foundation. Learning to read these interior signs allows you to catch issues that might otherwise go unnoticed until they become severe.
Your Actionable Path Forward
Armed with your completed foundation inspection checklist, your next steps are clear and strategic. This is where your diligent work translates into concrete action.
1. Categorize Your Findings:
Review your notes and group your observations by severity. Use a simple traffic light system:
* Green (Monitor): Minor hairline cracks (less than 1/16 inch) with no displacement, or minor cosmetic issues. Re-inspect these areas quarterly.
* Yellow (Investigate Further): Cracks that have grown over time, signs of moisture intrusion, or doors/windows that have recently started to stick. These warrant more frequent monitoring and potentially a professional consultation.
* Red (Act Immediately): Large, displaced cracks (wider than 1/4 inch), significant floor settlement, evidence of structural movement like bowing walls, or active water leaks. These are clear signals to call an expert without delay.
2. Implement Preventative Measures:
For any “Green” or “Yellow” items related to drainage, you can take immediate action. Clean your gutters, extend downspouts away from the foundation, and assess the grading of your landscape. Simple, proactive maintenance is your most cost-effective tool.
Key Insight: Preventing foundation damage is always cheaper and less disruptive than repairing it. By focusing on water management and regular inspections, you are actively investing in your property’s future value and safety.
Recognizing the boundary between diligent DIY assessment and the need for professional intervention is crucial. This checklist empowers you to have a more informed conversation with a specialist, but it is not a substitute for a structural engineer or a highly experienced foundation repair contractor. When your findings fall into the “Red” category, or even the “Yellow,” seeking an expert opinion is the most responsible next step. Your home’s structural integrity is too important to leave to chance.
When your foundation inspection checklist uncovers issues that require an expert eye, you need a partner with deep, localized knowledge of North Texas soil. For a transparent, data-driven assessment and solutions tailored to your specific property, trust the specialists at Black Beard Foundation Repair. Schedule your free, no-obligation evaluation today to gain peace of mind and a clear plan for securing your foundation’s future. Black Beard Foundation Repair


